In this tutorial I will show you how to configure free, auto-renewing SSL certificates for WordPress websites that are hosted on Google Cloud Platform using the Bitnami version of WordPress on Google Cloud Platform.
Having SSL Security on your website will improve your Google search ranking.
Luckily for you, this step-by-step tutorial is super easy to follow. All you have to do is follow along with the video as I install an SSL certificate for my domain eborchids.com.
Before getting started with this tutorial, you should have already installed WordPress on Google Cloud Platform, and set up a domain name for your WordPress website.
So let’s get started.
There are 9 steps in this tutorial:
-
1. Connect to WordPress via SSH
-
2. Install Git
-
3. Install CertBot Client
-
4. Generate Certificates
-
5. Setup Certificate Auto-Renewal
-
6. Configure the Certificates
-
7. Update Domain URLs
-
7. Restart your Apache Server
-
8. Test your Configuration
1. Connect to WordPress via SSH
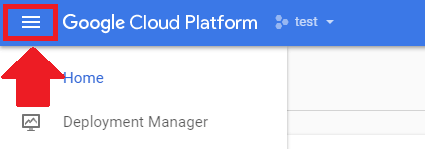
Go to your Google Compute homepage and click the hamburger menu in the upper left-hand corner.
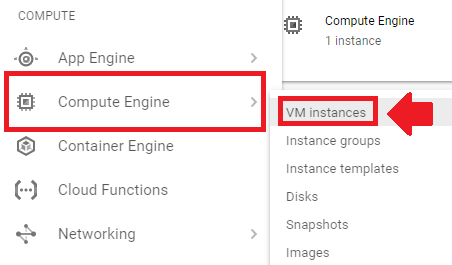
Go to your Compute Engine, then to VM instances to access your WordPress installation.
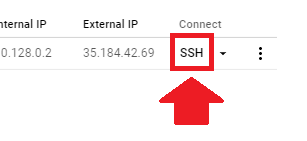
Once inside your Compute Engine, click on the SSH button to connect to your WordPress installation.
2. Install Git
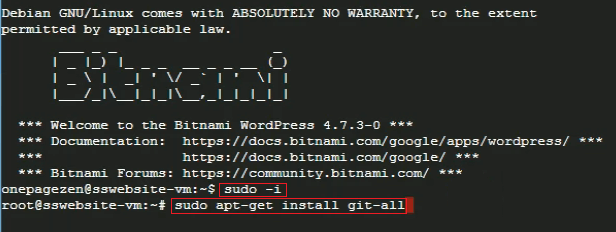
Once you’ve connected to your instance, we will run the commands below to tell Apache to install Git. The Sudo -i command will put you in root mode, and the apt-get command will tell Apache to download Git. Press “ENTER” after entering each command.
sudo -i

sudo apt-get install git-all
3. Install CertBot Client
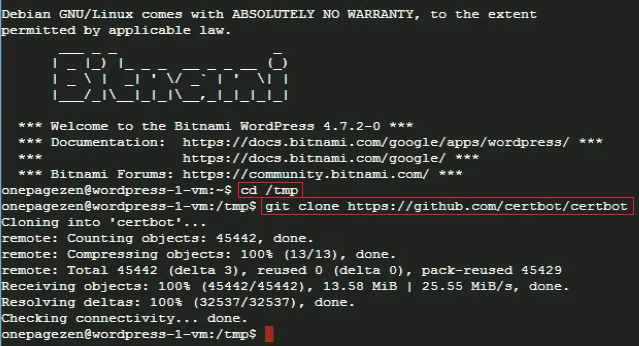
Now that you’ve installed Git, we will enter the “cd /tmp” command to navigate to our temporary file directory. Next, we will run the “git clone …” command to download the certbot files.
cd /tmp

git clone https://github.com/certbot/certbot
After running each of these commands, you can stay in the same SSH window or exit and open a new one.
4. Generate Certificates
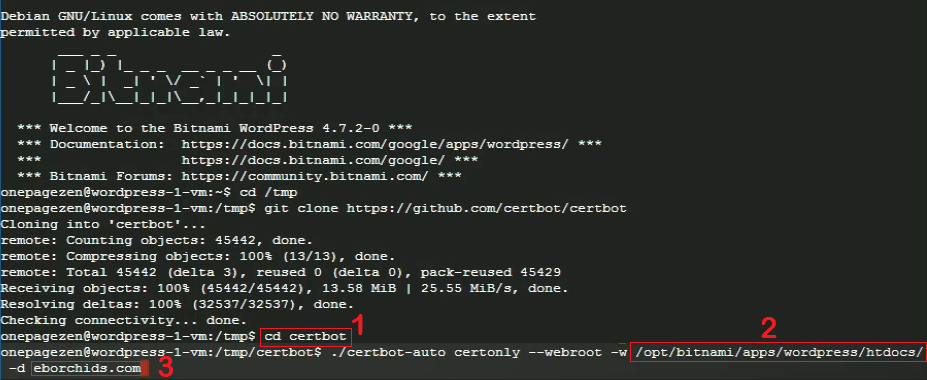
In this step, we are going to generate our certificates. Based on the picture, figure 1 represents the command to access your certbot directory. Figures 2 and 3 are part of one command, where 2 is the path to your website’s root directory, and 3 is your website’s domain name.
cd /tmp/certbot

./certbot-auto certonly --webroot -w /opt/bitnami/apps/wordpress/htdocs/ -d eborchids.com -d www.eborchids.com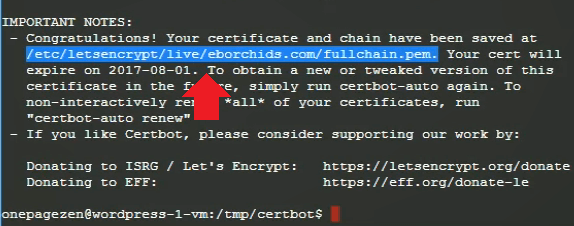
After entering these commands, your certificates will be generated. Take note of the directory where your certificates are installed.
5. Setup Certificate Auto-Renewal
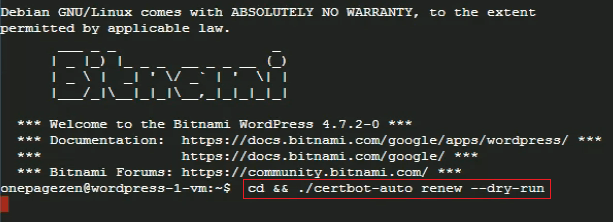
Before setting up auto-renewal for our certificates, we are first going to run the function below in order to test the auto-renew function.
cd /tmp/certbot/
./certbot-auto renew --dry-run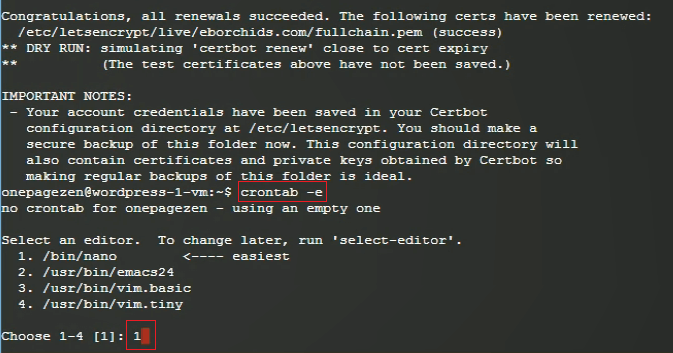
Next, we will use the crontab command to set a schedule for checking for renewals. Then, we will enter 1 to choose nano as our text editor.
crontab -e

1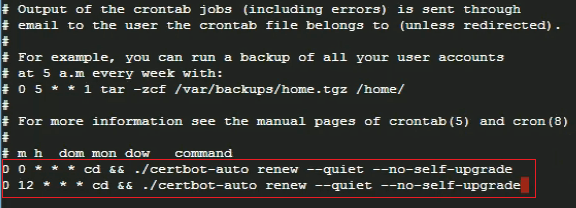
Next, we will enter a command that tells the server to check for certificate renewals two times per day. After entering the command, press ctrl+o to save changes to the file.
0 0 * * * cd && ./certbot-auto renew --quiet --no-self-upgrade
0 12 * * * cd && ./certbot-auto renew --quiet --no-self-upgrade
6. Configure the Certificates
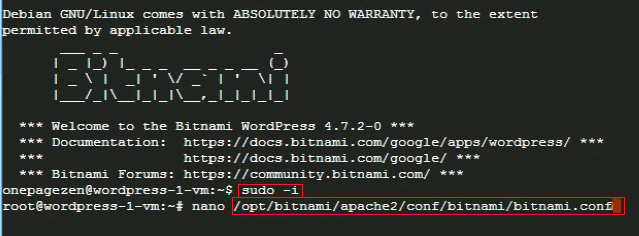
The next step is to configure your certificates. We will run the first command to enable root access, then the second command to edit our bitnami configuration file.
sudo -i

nano /opt/bitnami/apache2/conf/bitnami/bitnami.conf
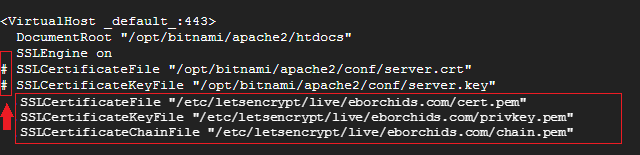
Now that we've entered the Bitnami configuration file, deactivate the existing certificates by placing a # next to them. Below, copy your new certificate paths and paste them into the file with shift+insert.
SSLCertificateFile "/etc/letsencrypt/live/eborchids.com/cert.pem"
SSLCertificateKeyFile "/etc/letsencrypt/live/eborchids.com/privkey.pem"
SSLCertificateChainFile "/etc/letsencrypt/live/eborchids.com/chain.pem"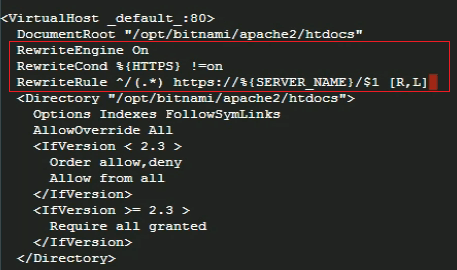
Next, we need to paste the following 3-lines of code below the VirtualHost_default_:80 section of the bitnami configuration file. This will tell the server to always serve our website's pages with HTTPS encryption.
RewriteEngine On
RewriteCond %{HTTPS} !=on
RewriteRule ^/(.*) https://%{SERVER_NAME}/$1 [R,L]
After adding this code, enter ctrl+o to save changes, followed by ctrl+x to exit back to our home screen.
7. Update Domain URLs
Changing your website URLs via Settings > General is disabled in the Bitnami version, so you'll need to change your URLs by editing your wp-config.php folder.

From your Google Cloud Platform dashboard navigate to "Compute Engine" > "VM Instances".

Once inside of your Compute Engine, click on the SSH button to connect to your WordPress installation.
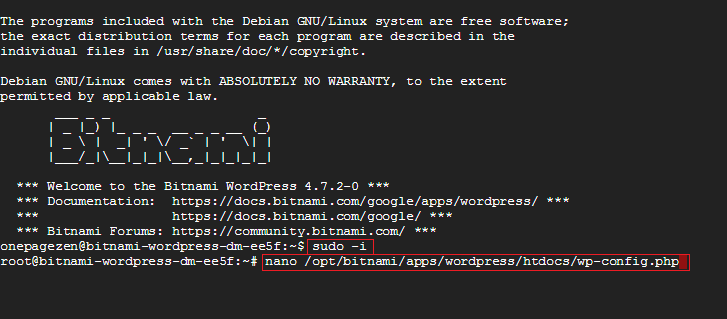
Once connected via SSH, connect as a root user and open your wp-config.php file in the nano editor.
sudo -i
nano /opt/bitnami/apps/wordpress/htdocs/wp-config.php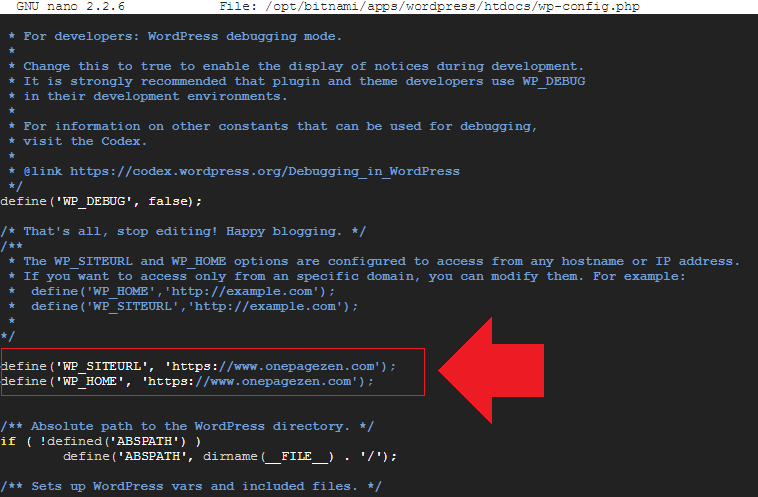
Inside of your wp-config.php file, you will need to replace your SiteURL and HomeURL definitions as shown below.
REPLACE THIS:

define('WP_SITEURL', 'http://' . $_SERVER['HTTP_HOST'] . '/');
define('WP_HOME', 'http://' . $_SERVER['HTTP_HOST'] . '/');


WITH THIS:

define('WP_HOME','https://yourdomain.com');
define('WP_SITEURL','https://yourdomain.com');
Remember to replace DOMAIN with either the www. or non-www. version of your domain name - whichever your prefer. For example:
define('WP_HOME', 'https://www.yourdomain.com');
define('WP_SITEURL', 'https://www.yourdomain.com');
After adding this code, enter CTRL+o to save changes, followed by CTRL+x to exit back to your home screen.
8. Restart your Apache Server
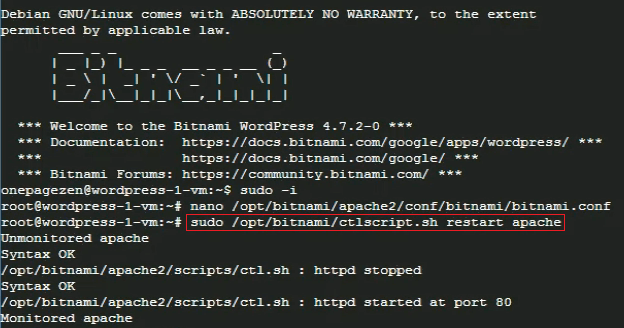
In order for your certificate changes to take effect, you need to restart you Apache server by entering the command below.
sudo /opt/bitnami/ctlscript.sh restart apache
9. Test your Configuration
Visit the domain where where you installed the certificate. If your SSL certificate isn't working, check your configuration at www.ssllabs.com/ssltest/.
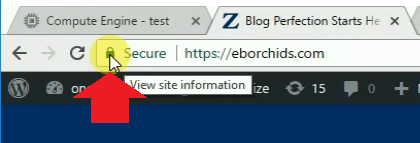
Did it Work?
If your SSL certificates were configured properly, you will notice that your website is being loaded with a green padlock icon.
Because we configured auto-renewal for our certificates, we don't ever need to renew them or setup new ones.
Pretty cool, huh?


